Quantcast
Channel: Fox Infotech
Viewing all 231 articles
Browse latest View live

Oracle 12c Tutorial: Create Local User In Oracle Database 12c

$
0
0
In this tutorial you will learn how to create a local user in Oracle Database 12c and how to give admin rights to that user and how to import an user (schema) exported by Oracle 11g database into Oracle 12c database.

First I will give you just a brief introduction about Oracle 12c Architecture. Prior to Oracle 12c like Oracle 11g and Oracle 10g there is happen to be only one database root in which Oracle Admin users like Sys, system etc installed and some sample schema also if you choose to install and on that root you just create your users / schema to store application data. But In Oracle 12c it is different and there is now two roots one is the Oracle's default admin user root which is called CDB$ROOT and another is PDB root in which you create your users / schema same as you create in Oracle 11g or 10g. As CDB$ROOT is the admin root you can not create your application's local user in that root, you must create the users in PDB (pluggable database root) because if you will try to create a user in CDB$ROOT then you will get the following errors.

 SQL> create user hms identified by hms;
create user hms identified by hms
            *
ERROR at line 1:
ORA-65096: invalid common user or role name

Or if you try to create this way then you will receive this error:

SQL> grant connect, resource, dba to hms identified by hms;
grant connect, resource, dba to hms identified by hms
*
ERROR at line 1:
ORA-65049: creation of local user or role is not allowed in CDB$ROOT

So I will tell you some important instructions on installing Oracle database 12c, which is when you install Oracle database 12c then you must choose the Pluggable database option while installing because you can create your application's user in PDB only or if you not selected PDB at the time of installation then I will tell you that how to create PDB database after installation.

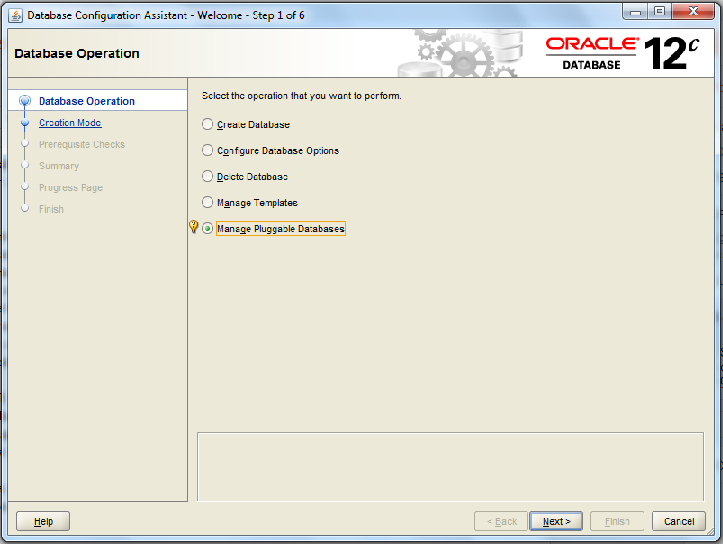
To create a Pluggable database in Oracle 12c, click on start menu then choose Oracle12chome then Configuration and Migration Tools then Database Configuration Assistant then the following screen will appear:


Select Manage Pluggable Databases option as shown above and click on Next and the following screen will appear:


Select Create Pluggable Database and click on Next to continue...


Specify Sys user credentials then click on Next to continue...


Select Create a new Pluggable Database option then click on Next to continue..


Specify your Pluggable database name and user credentials then click on Next to continue.. I specified hms for my Hospital Management System database application to give you an example:


It will show you the summary of installation, just click on Finish to create Pluggable database and after completion the following screen will appear:


Now your Pluggable database creation is complete and now you need to connect it to do this you must specify its connection information in TNSNAMES.ORA file because this Pluggable database would be consider as a new Oracle database service.

Add the following in your tnsnames.ora file:

HMS =
  (DESCRIPTION =
    (ADDRESS_LIST =
      (ADDRESS = (PROTOCOL = TCP)(HOST = localhost)(PORT = 1521))
    )
    (CONNECT_DATA =
      (SERVICE_NAME = hms)
    )
  )

Replace hms, host and port information according to your database and machine information and then save.

Now this pluggable database must be start to connect to it, so log in with Sys user credentials to your database and give the following command:

SQL> Alter Pluggable Database hms open;

After that you can connect as following:

Type Connect and give the credentials:

SQL> conn

Enter user-name: hms/hms@hms
Connected.
SQL>

Now we have connected but our schema is empty because we don't have any objects in it, so we will import a database dump in this Oracle 12c Pluggable database which have been exported from Oracle 11g.

For this user must have proper privileges to do this task, so first we will give admin privileges to hms user to perform import task and for this you have to reconnect using Sys user then give the DBA privilege to hms as following:

SQL> conn
Enter user-name: sys/vinish@orcl as sysdba
Connected.
SQL> rem set session to hms to access this db from sys
SQL> alter session set container=hms;

Session altered.

SQL> grant dba to hms;

Grant succeeded.

SQL> connect
Enter user-name: hms/hms@hms
Connected.
SQL>

Now you run IMP command to import a database dump file (.dmp) into this hms user, to perform this task do the following:

Microsoft Windows [Version 6.1.7600]
Copyright (c) 2009 Microsoft Corporation.  All rights reserved.

C:\Users\Vinish>IMP USERID=hms/hms@hms file=d:\vinish\hms14may.dmp full=y

Its done. Now you can check your user for the objects:

SQL> select * from tab;

You can now create users also through hms to access hms objects, the following is the example:

SQL> create user hmsuser1 identified by hmsuser1;

User created.

SQL> grant connect, resource to hmsuser1;

Grant succeeded.
Create Hierarchical Tree To Control Records In Oracle Forms

$
0
0

Providing an example form for creating hierarchical trees in Oracle Forms to control data block records. In this form whenever user selects any node in tree menu then corresponding record is displayed at right side.

This form is having two data blocks, EMP and Control, the control block is having Tree Item and populating that tree on PRE-FORM trigger with the following code:

ftree.populate_tree('CONTROL.EMP_TREE');
ftree.set_tree_property('CONTROL.EMP_TREE', FTREE.QUERY_TEXT,
   'SELECT decode(level, 1, 1, -1), level, INITCAP(ename), ''fxrun'',' ||
    'empno FROM   SCOTT_emp ' ||
    'START WITH mgr IS NULL CONNECT BY PRIOR empno = mgr');

And whenever user select any node then the following code is written on When-Tree-Node-Selected trigger to fetch the record for the selected employee:

go_block('EMP');
set_block_property('EMP', DEFAULT_WHERE, 'EMPNO='||
   ftree.get_tree_node_property('CONTROL.EMP_TREE', :SYSTEM.TRIGGER_NODE,
      FTREE.NODE_VALUE));
execute_query;

The fxrun.ico icon and table scott_emp is used in this example and script of this table and icon file are available in source code.

3 NEW Best Features Of CREATE TABLE Command Introduced In Oracle 12c

$
0
0
Describing 3 new useful Create Table command enhancements introduced in Oracle Database 12c. These new features were really required to improve the coding and performance.

1. Assign Default Values To Columns Using Sequence

You can now assign sequence number as default value to a particular column in Oracle 12c to generate unique value for every row. The following is the example given to generate serial number for every record inserted into EMP table:

Create Sequence Seq_Srl_No start with 1 increment by 1;

Create Table Emp (
  Emp_no Integer Constraint Pk_Emp_No Primary Key,
  Emp_Name Varchar2(100),
  Emp_Srl_No Integer Default Seq_Srl_No.nextval 
  );

2. Generate Automatically Default Unique Number Using IDENTITY

In Oracle 12c, we can generate unique number value for a column without using sequence object, by specifying Identity keyword in Create Table Command. The following is the example given for Emp table to generate unique number which starts with 10 and increment by 2 for every new record;

Create Table Emp (
  Emp_no Integer Constraint Pk_Emp_No Primary Key,
  Emp_Name Varchar2(100),
 Emp_Srl_No Integer GENERATED BY DEFAULT AS IDENTITY (START WITH 10 INCREMENT BY 2));

3. VISIBLE And INVISIBLE Columns In Tables

You can define Invisible columns in a Table using Create Table command in Oracle database 12c. By default every column is visible when we create a table in Oracle, but now in Oracle 12c you can specify Invisible keyword to hide a column. In the below example, a Credentials table is created with the hidden password column:

CREATE TABLE Credentials (
username varchar2(30),    
password varchar2(30) INVISIBLE
 );
   
When we describe this table using DESCRIBE command to see its structure the following would be the result:

SQL> DESC CREDENTIALS
Name                         Null?    Type  
---------------------------------------- -------- ----------------------------
USERNAME                   VARCHAR2(30) 

The PASSWORD column is hidden from the above result, so if you want to see that column you must set the COLINVISIBLE to on:

SET COLINVISIBLE ON;

Now you would be able to see that hidden column using describe command:

SQL> DESC CREDENTIALS
Name                          Null?    Type
---------------------------------------- -------- ----------------------------
USERNAME                     VARCHAR2(30)
PASSWORD (INVISIBLE)                   VARCHAR2(30)

Note: You must specify that column specifically in DML statements to process it else it would be not considered and my through an error. The following example shows if we insert directly to CREDENTIALS Table without specifying this PASSWORD column:

SQL> INSERT INTO CREDENTIALS VALUES ('SCOTT', 'TIGER'); 

INSERT INTO CREDENTIALS VALUES ('SCOTT', 'TIGER')

* ERROR at line 1: 
ORA-00913: too many values 

However we can insert by specifying value only for USERNAME column because PASSWORD COLUMN is nullable:

SQL> INSERT INTO CREDENTIALS VALUES ('SCOTT'); 

1 row created.

So if we want to insert a value to password column also then we must specify in insert statement, check the following example:

SQL> INSERT INTO CREDENTIALS (USERNAME, PASSWORD) VALUES ('SCOTT', 'TIGER'); 

1 row created.
Oracle 12c SQL new features and enhancements

How to Log Users Login and Logout Details Through Oracle Forms

$
0
0
Log user's login and logout details in to table through Oracle Forms using POST-LOGON and PRE-LOGOUT triggers to track the user's login and logout activity for auditing purposes.

Track user login logout activity in Oracle Forms
In this example one table and a sequence object is used to log the data in to table called login_out and the login information would be logged through Post-Logon trigger and logout information would be logged through Pre-Logout trigger in Oracle Forms. Follow the below mentioned steps to perform this task.

1. Create a Sequence object in Oracle Database.

CREATE SEQUENCE login_seq
   START WITH 1
   INCREMENT BY 1
   NOCACHE
/

2. Create a Table in Oracle Database.

CREATE TABLE login_out
(
   srlno     NUMBER (10) PRIMARY KEY,
   loguser   VARCHAR2 (20 BYTE),
   indate    DATE,
   outdate   DATE
)
/

3. Create a Post-Logon Trigger at Form Level in Main Form of Your Application.

DECLARE
   v_seq    NUMBER (10);
   v_user   VARCHAR2 (20) := GET_APPLICATION_PROPERTY (username);
BEGIN

   SELECT login_seq.NEXTVAL INTO v_seq FROM DUAL;
   
   /* this global variable is created to use on pre-logout trigger to update the correspondent record. */
   :Global.login_seq := v_seq;
   
   INSERT INTO login_out (srlno, loguser, indate)
       VALUES (v_seq, v_user, SYSDATE);

   COMMIT;
   
EXCEPTION
   WHEN OTHERS
   THEN
      RAISE form_trigger_failure;
END;

4. Create a Pre-Logout Trigger at Form Level in Main Form of Your Application.

DECLARE
   v_seq    NUMBER (10) := :GLOBAL.login_seq; 
BEGIN

   Update login_out 
      set outdate = SYSDATE
      where srlno = v_seq;

-- No need to commit here it will do automatically

EXCEPTION
   WHEN OTHERS
   THEN
      RAISE form_trigger_failure;
END;

Now run the form and after that you can check the login_out table to view the data as following:

SELECT *
  FROM login_out
 WHERE TRUNC (indate) = TRUNC (SYSDATE)
 /
Note: These triggers should added into Main Form only of your application, not in every form.

3 Best Books For AngularJS - Must Read

$
0
0
The following are the details of best 3 books to learn AngularJS.

Pro Angular JS

AngularJS is the leading framework for building dynamic JavaScript applications that take advantage of the capabilities of modern browsers and devices. AngularJS, which is maintained by Google, brings the power of the Model-View-Controller (MVC) pattern to the client, providing the foundation for complex and rich web apps. It allows you to build applications that are smaller, faster, and with a lighter resource footprint than ever before.

Best-selling author Adam Freeman explains how to get the most from AngularJS. He begins by describing the MVC pattern and the many benefits that can be gained from separating your logic and presentation code. He then shows how you can use AngularJS's features within in your projects to produce professional-quality results. Starting from the nuts-and-bolts and building up to the most advanced and sophisticated features AngularJS is carefully unwrapped, going in-depth to give you the knowledge you need.

Unraveling AngularJS 1.4

AngularJS is a great technology to create dynamic web sites with the Single Page Application model. From this book you can learn not only the fundamentals, but you will also grasp the essence of internal mechanisms that drive Angular.

Professional AngularJS

Most of the existing guides to AngularJS struggle to provide simple and understandable explanations for more advanced concepts. As a result, some developers who understand all the basic concepts of AngularJS struggle when it comes to building more complex real-world applications. Professional AngularJS provides a thorough understanding of AngularJS, covering everything from basic concepts, such as directives and data binding, to more advanced concepts like transclusion, build systems, and automated integration testing. In addition to explaining the features of AngularJS, this book distills real-world experience on how these features fit together to enable teams to work together more effectively in building extraordinary apps.
3 Must read books for angularJS

Top 3 Books To Learn ECMAScript 6 - Javascript ES6

$
0
0
The following are the top 3 selling books for EcmaScripts (Javascripts ES6). You must read at least any one from these books to gain good knowledge in EcmaScript language.

Learning ECMAScript 6

Learn all the new ES6 features and be amongst the most prominent JavaScript developers who can write efficient JS programs as per the latest standards. Learn a powerful approach to writing object-oriented JavaScript code using ES6. Create and use ES6 modules to learn to write smart, modularized JavaScript code. The book will take you step-by-step through a wide array of examples, giving you tips on how to make the best use of the latest ES6 features.

ECMAScript 6

Learn One of The Most Powerful Scripting Languages that is implemented in the Form of JavaScript, JScript and ActionScript The development of Javascript was solely based on ECMAScript (ES). This is a scripting language which is used on the client side of the web. The language introduced numerous features which programmers can use to develop complex libraries. ECMAScript comes in different versions. 

JS.Next: ECMAScript 6

S.next is the most significant change to JavaScript since its initial release in 1995. This practical book educates JavaScript developers, from novice to expert, about the impact that JS.next has had on the language, and demonstrates the powerful new constructs that are accessible in the JS.next API. Complete with code examples, the references and explanations will bring your knowledge of JavaScript into the now, and will jump start any developer's ability to code in modern JavaScript.

Top 3 books to learn ecmascript 6

How to Check How Many Users Logged in Linux/Unix

$
0
0
You can check how many users logged in Linux or Unix systems. To check currently logged in users in Linux/Unix there are multiple commands are available like who, w, finger and pinky. Below is the example to display the users logged in Linux/Unix box with who command:

$ who

The following is the sample of four columns 1st is user name, 2nd is terminal name, 3rd is logged in time and the 4th is from where they logged in:

vkapoor   pts/3 Nov 01 12:23 (xyz.com)
foxuser    pts/5 Nov 01 13:22 (xyz.ip)

Use the am i option to view the current user information as shown below:

$ who am i

There is another command w the alternative to who command and gives the information in more details. Below is the example to check the currently logged in users Linux with w command:

$ w

To view a specific user's logged in details with w command, use the w command with user name, as showing in the following example:

$ w vkapoor

You can use the finger command also to list the users logged in, as shown in below example:

$ finger

Similarly use the pinky command to list out the users logged in Linux:

$ pinky

How to check how many users logged in linux/unix

How to Check Semaphores in Linux/Unix

$
0
0
How to check semaphores in Linux/Unix ? How to display semaphores in Linux/Unix ? How to view semaphores in Linux/Unix ?

About Semaphores

Semaphores are used to access to shared system resources. They act as gatekeepers to ensure that particular shared system resources are not accessible by multiple processes at the same time. Oracle Databases use semaphores to manage access to operating system resources such as shared memory.

Display Semaphores Existing Values

When we install Oracle Documentation it recommends to set semaphores to some values, so before modifying semaphores values we must check semaphores parameters. 

To view the semaphores information you need to display the contents of /proc/sys/kernel/sem file. Below is the example is given to view the semaphores data using cat command:

$ cat /proc/sys/kernel/sem
340 44000 300 234

You can see above that there are 4 values which represents the following 4 semaphores kernel values:

semmsl - Maximum number of semaphores per set
semmns - Maximum number of semaphores on entire system
semopm - Maximum operations for semop system call
semmni - Maximum number of semaphore arrays on entire system

How to check semaphores in linux/unix


How to Export Data into CSV File in Oracle Using PL SQL Procedure

$
0
0
Below is the step by step example is given to export data into CSV file in Oracle database using PL SQL procedure. In this example data is being exported from some fields of Emp table of Scott schema to a CSV file using UTL_FILE Oracle package.

Follow the below steps to export data from Oracle Database table to a CSV file.

1. Create a Directory Object in which you will write CSV file.

-- for windows systems create as following change the folder highlighted with your directory
CREATE OR REPLACE DIRECTORY CSVDIR AS 'd:\temp'
/
-- for Unix/Linux systems create as following
CREATE OR REPLACE DIRECTORY CSVDIR AS '/temp/'
/

Note: Change the folder location to your directory location e.g. c:\abc or /abc/.

2. Create a Database Procedure in Scott schema or if you are creating in other schema then make sure you have Emp table in that schema, else you need to change the Cursor and the field references for any other table.

CREATE OR REPLACE PROCEDURE export_to_csv
IS
   v_file     UTL_FILE.file_type;
   v_string   VARCHAR2 (4000);

   CURSOR c_emp
   IS
      SELECT empno,
             ename,
             deptno,
             sal,
             comm
        FROM emp;
BEGIN
   v_file :=
      UTL_FILE.fopen ('CSVDIR',
                      'empdata.csv',
                      'w',
                      1000);
   -- if you do not want heading then remove below two lines
   v_string := 'Emp Code, Emp Name, Dept, Salary, Commission';
   UTL_FILE.put_line (v_file, v_string);

   FOR cur IN c_emp
   LOOP
      v_string :=
            cur.empno
         || ','
         || cur.ename
         || ','
         || cur.deptno
         || ','
         || cur.sal
         || ','
         || cur.comm;
      UTL_FILE.put_line (v_file, v_string);
   END LOOP;

   UTL_FILE.fclose (v_file);
EXCEPTION
   WHEN OTHERS
   THEN
      IF UTL_FILE.is_open (v_file)
      THEN
         UTL_FILE.fclose (v_file);
      END IF;
END;

3. Now run the procedure as following:

BEGIN
   export_to_csv;
END;

You can now check your directory you specified in Create Directory command that the file empdata.csv must exists with the table data.

Export data into csv in Oracle Database

Download Nursing School Software to Manage Medical Transcription Record

$
0
0
The unique software to manage Nursing School's Students information like Medical Transcription Records, Bio-Data, Leave Records, Admission Register. This software also manages Teaching Staff details and Library System with comprehensive data entry screens and reports for every option.

With this Nursing School Software, user would be able to enter their student's master data as well as their 3 years study records related to medical transcription, Examination details and Leave records. Nursing schools can also manage their teaching staff details and their school's whole library. The following are the screen shots and details of the software.

1. The Main Screen of the software which represents the whole Menu system.

This is the main screen of the software in which you can see left side is the Menu of the software like Nursing, Reports, Teaching Staff, Library Data Entry and right side are the utilities to create Student's rotation plan. With this Nursing school software users can create rotation plan reports which gives the information on student's rotation to hospital's department for their practices.

Nursing School Software To Manage Medical Transcription

2. Student's Master Data Entry

You can see the below screen which is having comprehensive data entry fields to enter full details of the student. User can enter their own Nursing School's admission numbers and GNM Registration numbers.
Student's master data entry option Nursing School software

 3. First Year Clinical Record Entry Screen

After entering student's master data user can enter student's study records entry as shown in below screen. The User will enter only Admission number of the students and it will fetch student's name and the batch year information and if the record entry already exists it will fetch the whole record in which user can edit, if not exists then it will allow user to create a new entry and this functionality follows in whole software for data entries.

Medical Transcription Record entry Nursing School Software

 4. Student's Leave Record Entry 

Nursing School software student's leave record entry

 5. Nursing School Examination Record Entry

Nursing school software examination record entry

 6. Create Certificate Entry

Nursing school software certificate entry

 7. Admission Register Entry

Admission Register Entry Nursing school software

 8. Medical Transcription Record Report Printing

Medical Transcription record report printing Nursing school software

 9. Reports Menu Screen

Report Menu of nursing school software

 10. Teaching Staff Record Entry

Teaching staff entry nursing school software

 11. Library Management System

Library Management System software

 How To Install

Just extract the zip file NursingSoft.zip to any drive of your computer, then you will find the folder NursingSoft, double click on that folder and locate NursingSoft.Exe the software executable file, right click on it then highlight Send to and then click on Desktop Create Shortcut to create the shortcut.

how to install nursing school software

 Run The Software

Now just double click on the NursingSoft shortcut icon to run the software.

Nursing School Software

Download The Software

The software cost is USD $99 and you can download the software with the following link:

Lockerdome - A Fantastic Interest Based Social Network

$
0
0
LockerDome is an interest based social network website founded in 2008. LockerDome - as it says, it helps you personalize the web. Yes with Lockerdome you can view the web content topic wise and also you can share your website or blog's content with Lockerdome in a particular topic or category. Means you don't need to add list of websites or social pages, but a topic containing multiple articles from multiple websites or social pages. You can create your on personalized pages for your favorite topics and in Lockerdome it is called Lockers, in which you can add external content of your interests as Hang and also you can add your own blog or website's content. A viewer can Vote also in Lockerdome by making an article Interesting or Not Interesting. Below is the screen shot of Lockerdome page for Tech topic:

Lockerdome tech topic page

For me Lockerdome is a good option to share my blog's content across the web to target people looking for interest based content. It is having many other features you can check your self by visiting the site with the following link https://lockerdome.com/

8 Most Required Examples Reference For Oracle Forms

$
0
0
Check the following 8 Links for best Oracle Forms examples with source code (Fmb files), which will work in any version of Oracle Forms. The examples are given for "Oracle Form's Triggers", "Hierarchical Trees", "Stacked Canvases", "Alerts", "List Item", "From Clause Query", "Data Filter" and on "Conditional Forms". These are also most viewed and liked posts of this blog and I am listing below so that these posts can not be missed from anyone. The following are the topics:

  1. Oracle Form's Trigger Example with Sample Form Module
  2. Create Hierarchical Tree in Oracle Forms.
  3. Learn to Create Stacked Canvas to Scroll Horizontal Tabular Data Block
  4. Learn to Create Dynamic Alert for All Types of Messages.
  5. Populate List Item Example - Oracle Forms
  6. From Clause Query Data Block Example - Oracle Forms
  7. Filter Records Before Query by Custom Data Filter
  8. Example for: If Value Exists Then Query Else Allow Create New Record

8 Most Required Examples for Oracle Forms

Simple Shell Script Example To Check If Oracle Database Is Up In Linux / Unix

$
0
0
Check Oracle Database status in bash shell
You want to write a simple shell script in Linux / Unix to check whether Oracle Database is Up or not. The below is the example script which you can write using vi editor. Follow these steps to create and execute a shell script in Linux / Unix.

Run vi editor and add below content by changing values accordingly as mentioned in next paragraph.

#! /bin/bash
ORACLE_SID=FOXDEV
ORACLE_HOME=/orahome1/oracle/product/11.2.0/db_1
PATH=$ORACLE_HOME/bin:$PATH
echo "select 'Database is UP and Running!' db_status from dual;" | sqlplus -s system/psw
exit 0

Change the ORACLE_SID and ORACLE_HOME variable values to your Oracle database information and change the password also for system user or you can use any other user credential details as you are executing just a simple query from dual. After completing the editing save this file and give a name, for this example we can assume file name as isdbup.sh.

Now to execute the script "isdbup.sh" first you need to make the script executable, so give the following chmod command to make the file executable:

$ chmod u+x isdbup.sh

The above command will change the permission for the owner (u) of the file to executable (x) and now you would be able to execute this script as following:

$ isdbup.sh

db_status
---------------
Database is UP and Running!

Blogger's New "Featured Post Gadget" (Launched in December 2015)

$
0
0
Blogger created a new gadget Featured Post to highlight a particular post in blogger blog, so that visitors would be able to get the attention about that post and able to view it. The following are the steps to how to add a "Featured Post Gadget / Widget" to your blog in blogger.

Add Featured Post Gadget / Widget in Blogger Blog

1. Go to Layout section of the blog and click on Add a Gadget and then select Feature Post gadget from the popup window, as shown in below image:

Add Featured Post Gadget / Widget in Blogger

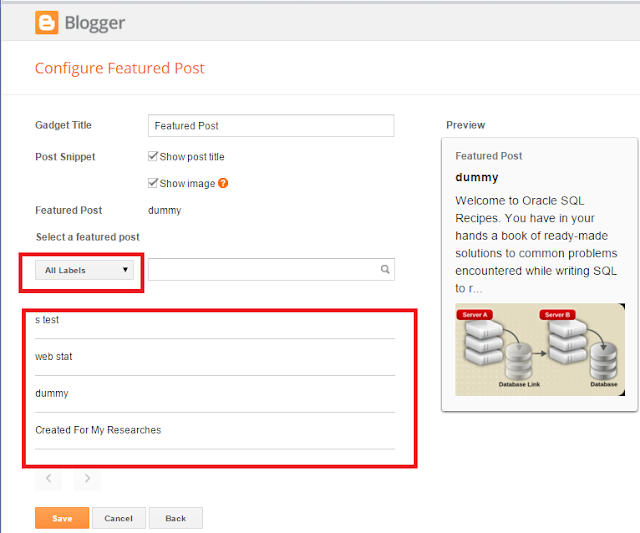
2. Then the following window will appear and then just choose Label from the drop down list and then choose the particular post in that label to show in Featured Post widget as shown in below image:

Blogger's new Featured Post Gadget

You are done, it will now show the Featured Post in your blog.

Create SQL*Plus Script Dynamically From SELECT Statement In Oracle

$
0
0
How to create SQL*Plus Script Dynamically in Oracle

I have created a stored procedure in Oracle to generate SQL*Plus script from a SELECT statement. It will take SQL SELECT statement as parameter and on that behalf it will create the SQL*Plus script as you can see in below example screen-shot, but it is having some limitations, which I will describe below but still it will definitely speed-up your work in creating SQL*Plus script from any given SQL Query. Also note that it will not PARSE the query, it will just read the columns from the statement between SELECT and FROM. You can pass the following types of SELECT statements as parameter to this procedure:
[success title="SELECT Without Aliases" icon="check-circle"]
SELECT
EMPNO, ENAME, JOB,
   MGR, HIREDATE, SAL,
   COMM, DEPTNO
FROM SCOTT_EMP S
[/success]
[success title="SELECT With Table Reference" icon="check-circle"]
SELECT
S.EMPNO, S.ENAME, S.JOB,
   S.MGR, S.HIREDATE, S.SAL,
   S.COMM, S.DEPTNO
FROM SCOTT_EMP S
[/success]
[success title="SELECT With Aliases" icon="check-circle"]
SELECT
S.EMPNO emp_no, S.ENAME employee_name, S.JOB Job,
   S.MGR, S.HIREDATE, S.SAL,
   S.COMM, S.DEPTNO
FROM SCOTT_EMP S
[/success]
[error title="SELECT With Expressions NOT ALLOWED" icon="exclamation-circle"]
SELECT
NVL(S.EMPNO, '19009') emp_no, S.ENAME employee_name, Decode(S.JOB, 'ABC', 'Y') Job,
   S.MGR, S.HIREDATE, S.SAL,
   S.COMM, S.DEPTNO
FROM SCOTT_EMP S
[/error]
NOTE: No need to pass the WHERE Clause of your query just pass the statement from "Select to... From ", you can add your query WHERE clause into script after the script generation.

Below is the stored procedure which you need to create in your schema to create SQL Scripts from it:
[code type="SQL"]CREATE OR REPLACE PROCEDURE create_sql_script (
   i_query        IN     VARCHAR2)
AS
   TYPE t_columns IS TABLE OF VARCHAR2 (100)
                        INDEX BY BINARY_INTEGER;

   v_columns   t_columns;
   v_query VARCHAR2 (4000)
         := REPLACE (REPLACE (i_query, CHR (13), ''), CHR (10), '');
   v_string VARCHAR2 (4000)
         := LTRIM (
               LOWER(SUBSTR (v_query,
                             INSTR (LOWER (v_query), 'select '),
                             INSTR (LOWER (v_query), ' from'))),
               'select ')
            || ',';
   i           NUMBER := 1;

   FUNCTION getstring (source_string    IN VARCHAR2,
                       field_position   IN NUMBER,
                       unterminated     IN BOOLEAN DEFAULT FALSE,
                       delimiter        IN VARCHAR2 DEFAULT ',')
      RETURN VARCHAR2
   IS
      iptrend           PLS_INTEGER := 0;
      iptrstart         PLS_INTEGER := 0;
      vcsourcestrcopy   VARCHAR2 (2000) := source_string;
   BEGIN
      IF unterminated
      THEN
         vcsourcestrcopy := vcsourcestrcopy || delimiter;
      END IF;

      IF field_position > 1
      THEN
         iptrstart :=
            INSTR (vcsourcestrcopy,
                   delimiter,
                   1,
                   field_position - 1)
            + LENGTH (delimiter);
      ELSE
         iptrstart := 1;
      END IF;

      iptrend :=
         INSTR (vcsourcestrcopy,
                delimiter,
                1,
                field_position);
      RETURN SUBSTR (vcsourcestrcopy, iptrstart, (iptrend - iptrstart));
   END getstring;                                         /* String Version */
BEGIN
   DBMS_OUTPUT.enable (200000);

   WHILE getstring (v_string,
                    i,
                    FALSE,
                    ',') IS NOT NULL
   LOOP
      v_columns (i) :=
         RTRIM (LTRIM (getstring (v_string,
                                  i,
                                  FALSE,
                                  ',')));

      IF INSTR (v_columns (i), '.') > 0
      THEN
         v_columns (i) :=
            SUBSTR (v_columns (i), INSTR (v_columns (i), '.') + 1);
      END IF;

      IF INSTR (v_columns (i), '') > 0
      THEN
         v_columns (i) :=
            LTRIM (SUBSTR (v_columns (i), INSTR (v_columns (i), '')));
      END IF;

      i := i + 1;
   END LOOP;

   DBMS_OUTPUT.put_line ('REM ********************************************');
   DBMS_OUTPUT.put_line ('REM * Script Name   : [Name].SQL');
   DBMS_OUTPUT.put_line ('REM * Description     : []');
   DBMS_OUTPUT.put_line ('REM * Author           : []');
   DBMS_OUTPUT.put_line ('REM * Created Date  : []');
   DBMS_OUTPUT.put_line ('REM * Parameter      : []');
   DBMS_OUTPUT.put_line ('REM ********************************************');
   DBMS_OUTPUT.put_line ('');
   DBMS_OUTPUT.put_line ('SET     HEADING   ON;');
   DBMS_OUTPUT.put_line ('SET     TERM      ON;');
   DBMS_OUTPUT.put_line ('SET     ECHO      OFF;');
   DBMS_OUTPUT.put_line ('SET     WRAP      OFF;');
   DBMS_OUTPUT.put_line ('SET     FEED      OFF;');
   DBMS_OUTPUT.put_line ('SET     VER       OFF;');
   DBMS_OUTPUT.put_line ('SET     UNDERLINE ON;');
   DBMS_OUTPUT.put_line ('SET     UNDERLINE =;');
   DBMS_OUTPUT.put_line ('SET     PAGESIZE  100;');
   DBMS_OUTPUT.put_line ('SET     LINESIZE  300;');
   DBMS_OUTPUT.put_line ('SET     COLSEP ,;');
   FOR n IN v_columns.FIRST .. v_columns.LAST
   LOOP
      DBMS_OUTPUT.put_line(   'COLUMN  '
                           || LTRIM (UPPER (v_columns (n)))
                           || ' FORMAT A20 HEADING '
                           || CHR (34)
                           || LTRIM (UPPER (v_columns (n)))
                           || CHR (34));
   END LOOP;

   DBMS_OUTPUT.put_line ('Spool YourFileName.csv');
   DBMS_OUTPUT.put_line (REPLACE (i_query, ';', ''));
   DBMS_OUTPUT.put_line ('/');
   DBMS_OUTPUT.put_line ('Spool Off;');
   DBMS_OUTPUT.put_line ('Exit');
   DBMS_OUTPUT.put_line ('/');
   DBMS_OUTPUT.put_line ('');
END;[/code]
Call this procedure as following:
[code type="SQL"]set serveroutput on;
BEGIN
   create_sql_script (
      'SELECT
S.EMPNO Employee_Number, S.ENAME Employee_Name, S.JOB,
   S.MGR, S.HIREDATE, S.SAL,
   S.COMM, S.DEPTNO
FROM SCOTT_EMP S;');
END;[/code]
Now capture the output generated through DBMS_OUTPUT command and paste it into file and save it as .SQL. Below is the output of above SELECT statement:
[code type="SQL"]REM ********************************************
REM * Script Name   : [Name].SQL
REM * Description   : []
REM * Author        : []
REM * Created Date  : []
REM * Parameter     : []
REM ********************************************
SET     HEADING   ON;
SET     TERM      ON;
SET     ECHO      OFF;
SET     WRAP      OFF;
SET     FEED      OFF;
SET     VER       OFF;
SET     UNDERLINE ON;
SET     UNDERLINE =;
SET     PAGESIZE  100;
SET     LINESIZE  300;
SET     COLSEP ',';

COLUMN  EMPLOYEE_NUMBER FORMAT A20 HEADING "EMPLOYEE_NUMBER"
COLUMN  EMPLOYEE_NAME FORMAT A20 HEADING "EMPLOYEE_NAME"
COLUMN  JOB FORMAT A20 HEADING "JOB"
COLUMN  MGR FORMAT A20 HEADING "MGR"
COLUMN  HIREDATE FORMAT A20 HEADING "HIREDATE"
COLUMN  SAL FORMAT A20 HEADING "SAL"
COLUMN  COMM FORMAT A20 HEADING "COMM"
COLUMN  DEPTNO FORMAT A20 HEADING "DEPTNO"

Spool YourFileName.csv

SELECT
S.EMPNO Employee_Number, S.ENAME Employee_Name, S.JOB,
   S.MGR, S.HIREDATE, S.SAL,
   S.COMM, S.DEPTNO
FROM SCOTT_EMP S
/
Spool Off;
Exit
/[/code]
You need to make some changes in header section and in COLUMN statements to specify exact length of the line and column and if column is numeric type then need to change the format also, as shown in below example:

COLUMN  SAL FORMAT 999999.99 HEADING "SAL"

You must change the line size according to your output and column separator if it is other than Comma ','

SET     LINESIZE  300;
SET     COLSEP ',';

Please comment below if you got issues during execution, thanks.

How To Create SQL Loader Control File Dynamically In Oracle

$
0
0
Generate SQL Loader Control File Dynamically

In my previous blog I posted to Generate SQL Plus script Dynamically and now I am providing a SQL Script to generate SQL Loader Control File dynamically from SQL script. You need to just run this script in the schema where that table exists for which you want to create the control file and after running the script it will prompt you to enter the Table name and after entering the table name it will generate the Control file for that table. You may need to edit control file after generation but a basic Control File would be created, which could be a very time saving.

Below is the SQL Plus Script from which you can generate the Control File:
[code type="SQL"]SET ECHO OFF;
SET HEAD OFF;
SET PAGESIZE 100;
SET LINESIZE 100;
SET UNDERLINE OFF;
SET FEED OFF;
SET VER OFF;

ACCEPT tblname CHAR PROMPT 'Enter Table Name: ';

SPOOL yourtable.ctl

SELECT    'LOAD DATA
APPEND INTO TABLE '
       || '&tblname'
       || '
FIELDS TERMINATED BY '','' OPTIONALLY ENCLOSED BY '''
       || CHR (34)
       || '''
TRAILING NULLCOLS ('
  FROM DUAL
UNION ALL
SELECT tab_cols
  FROM (  SELECT column_name || ',' tab_cols
            FROM user_tab_cols
           WHERE table_name = '&tblname'
        ORDER BY column_id)
UNION ALL
SELECT ')' FROM DUAL
/
SPOOL OFF
/
[/code]
Suppose if you will generate it for Scott.Emp Table, then the output of the control file would be as following:
[code type="SQL"]LOAD DATA                                                                                          
APPEND INTO TABLE EMP                                                                        
FIELDS TERMINATED BY ',' OPTIONALLY ENCLOSED BY '"'                                           
TRAILING NULLCOLS (
EMPNO,                                                                                            
ENAME,                                                                                            
JOB,                                                                                              
MGR,                                                                                              
HIREDATE,                                                                                          
SAL,                                                                                              
COMM,                                                                                              
DEPTNO                                                                                            
)                                                                                                  
[/code]

How To Commit Just One Data Block Changes In Oracle Forms

$
0
0
You have an Oracle Form in which you have multiple data blocks and requirement is to commit just one data block changes and not to effect any other data blocks. But suppose you have a commit_form button also in form which will commit all the data block changes and that functionality is ok and it should be there. But for a specific block there is a requirement to commit only that block changes when edited.

If you got this kind of requirement then you can insert and update records from that data block to database externally, I mean using insert and update statements and not by Oracle form's default commit behavior.

To accomplish this task you need to give a push button to the user to save explicitly that data block changes. I have created a form for this example and below is the screen shot of this form:

You can download this form with the following button:  Download


As you can see in above picture, there are two blocks, first one is Department and the second one is Employees and there is a push button labeled Commit Employees. In this form if user will change the data in both data blocks and presses the Commit Employees button then it will save only the Employees data block changes.

Following is the code is written in Commit Employees button to perform this task:

DECLARE
   CURSOR c_emp (p_emp emp.empno%TYPE)
   IS
      SELECT 'Y'
        FROM emp
       WHERE emp.empno = p_emp;

   v_exists   VARCHAR2 (1);
BEGIN
   GO_BLOCK ('Emp');
   FIRST_RECORD;

   LOOP
      IF :SYSTEM.record_status = 'CHANGED'
         OR:SYSTEM.record_status = 'INSERT'
      THEN
         OPEN c_emp (:emp.empno);

         FETCH c_emp INTO v_exists;

         CLOSE c_emp;

         IF NVL (v_exists, 'N') = 'Y'
         THEN
            UPDATE emp
               SET ename = :emp.ename,
                   job = :emp.job,
                   mgr = :emp.mgr,
                   hiredate = :emp.hiredate,
                   sal = :emp.sal,
                   comm = :emp.comm,
                   deptno = :emp.deptno
             WHERE empno = :emp.empno;
         ELSE
            INSERT INTO emp (empno,
                             ename,
                             job,
                             mgr,
                             hiredate,
                             sal,
                             comm,
                             deptno)
                VALUES (:emp.empno,
                        :emp.ename,
                        :emp.job,
                        :emp.mgr,
                        :emp.hiredate,
                        :emp.sal,
                        :emp.comm,
                        :emp.deptno);
         END IF;
      END IF;

      IF :SYSTEM.LAST_RECORD = 'TRUE'
      THEN
         EXIT;
      END IF;

      NEXT_RECORD;
   END LOOP;

   FORMS_DDL ('commit');
   -- REQUERY TO REFRESH CHANGES
   CLEAR_BLOCK (no_validate);
   GO_BLOCK ('dept');
   CLEAR_BLOCK (no_validate);
   EXECUTE_QUERY;
EXCEPTION
   WHEN OTHERS
   THEN
      FORMS_DDL ('rollback');
      MESSAGE ('error occurred.');
END;

What this above code will do is, it will check if record status is changed or new and then it will check from database that the record exists or not and if exists then it will update else will insert a new record.

Oracle Function Example To Get Number Of Days Between Two Dates

$
0
0
An Oracle function example is given below to calculate number of days between two dates. Just pass two dates as parameter to this function and it will return the number of days, which you can use in your SQL query.

Below is the function to get the number of days between two dates in Oracle:

CREATE OR REPLACE FUNCTION get_days (i_from_date IN DATE, i_to_date IN DATE)
   RETURN NUMBER
IS
   v_days   NUMBER;
BEGIN
   SELECT TRUNC (i_to_date) - TRUNC (i_from_date) + 1 INTO v_days FROM DUAL;

   RETURN v_days;
EXCEPTION
   WHEN OTHERS
   THEN
      RETURN 0;
END;
/

You can make it more custom as per your requirement. Below is the example for above function to use in SQL query:

SELECT get_days (TO_DATE ('11apr2016'), TO_DATE ('15apr2016')) AS days
  FROM DUAL;

Or call it through PL/SQL anonymous block:

SET SERVEROUTPUT ON;

DECLARE
   retval        NUMBER;
   i_from_date   DATE;
   i_to_date     DATE;
BEGIN
   i_from_date := '11apr2016';
   i_to_date := '15apr2016';

   retval := get_days (i_from_date, i_to_date);
   DBMS_OUTPUT.put_line ('Number of days :' || retval);
END;
/
Calculate number of days between two dates in Oracle by a function

How To Continue Cursor Loop Processing After Exception In Oracle

$
0
0
You are creating a PL/SQL Procedure in Oracle in which you are doing processing while looping through the cursor and if any error (exception) raises then you don't want to abort the processing but you want to log the error and to continue the processing.

Below is the example is given to handle such condition, in which I have created two exception sections, first one is to handle the error while cursor loop and the other one is to handle exception outside the cursor loop.

SET SERVEROUTPUT ON;

DECLARE
   CURSOR c_emp
   IS
      SELECT ROWNUM, empno, ename FROM emp;

   vn        NUMBER;
   vsqlcode   VARCHAR2 (20);
   vsqlerrm   VARCHAR2 (4000);
BEGIN
   FOR c IN c_emp
   LOOP
      BEGIN
         IF c.ROWNUM = 3
         THEN
            -- Generate an error at line 3
            vn := 'x';
         END IF;

      EXCEPTION
         WHEN OTHERS
         THEN

            vsqlcode := SQLCODE;
            vsqlerrm := SQLERRM;

            INSERT INTO error_log (error_no, ERROR_TEXT)
                VALUES (vsqlcode, vsqlerrm);
      END;
   END LOOP;

   COMMIT;
EXCEPTION
   WHEN OTHERS
   THEN
 
            vsqlcode := SQLCODE;
            vsqlerrm := SQLERRM;

      ROLLBACK;

            INSERT INTO error_log (error_no, ERROR_TEXT)
                VALUES (vsqlcode, vsqlerrm);

      Commit;
END;
Continue Cursor loop processing after an error in Oracle

Learn How To Attach PL/SQL Library In Oracle Forms

$
0
0
To attach a PL/SQL library in the Oracle Forms follow the following steps:

1. Click on Attached Libraries node in Object Navigator and then click on + button.

Attach library in oracle form

PLSQL attached libraries

2. Attach Library dialog window will open, then click on the Browse button to locate the .PLL file (extension of PL/SQL library in Oracle Forms).


3. After that click on Attach button to attach the selected library and then it will ask you to Remove Path then click on No button as shown below:

Attach a library in oracle forms

4. The library is now attached to your form.

Learn to attach library in Oracle d2k


Viewing all 231 articles
Browse latest View live


<script src="https://jsc.adskeeper.com/r/s/rssing.com.1596347.js" async> </script>